
Tags
antique nails, antique pine flooring, belt drum sander, cut nails, floor boards, orbital sander, wire nailes, wrought nails
After the heart-stopping floor actions of the past two days everything floor fell into place today. The upstairs of the house has smooth, level floors with a few places that need to be face nailed. Some of the stain is down and the floors are indeed going to be beautiful. It was a very good day. When I clumped down the stairs tonight at 8:30 pm I was tired but entirely satisfied with my days work.
This morning our contractor and we examined the floors carefully on both the main and upper levels of the house. We toured each room pondering the seams and the cupping and the end-to-end joints. When we arrived in the master bedroom it was clear there was a difference in the floors there compared to the other rooms. Part of the difference was due to the fact that we did not have paper covering over that room. Part of the difference was difference.
After mulling over options for the lumpy spots where the boards were not lying flat on the floor we devised a way to use antique reproduction face nails. We won’t have them across all of the floor, just where we need them. As time passes if a board springs up we can just tack it back down with a beautiful wrought head black oxide finish steel cut nail. We chose the wrought nail since it is ![]() reproduction of handmade nails.
reproduction of handmade nails.
For nail making, iron ore was heated with carbon to form a dense spongy mass of metal which was then fashioned into the shape of square rods and left to cool. The metal produced was wrought iron. After re-heating the rod in a forge, the blacksmith would cut off a nail length and hammer all four sides of the softened end to form a point. Then the nail maker would insert the hot nail into a hole in a nail header or anvil and with four glancing blows of the hammer would form the rosehead (a shallow pyramid shape). From The History of Nail Making, Glasgow Steel Nail
The wrought nail has the benefit of a square tapered body that is tapered down two sides of the shank. According to multiple websites I read, this type of nail has something in the neighborhood of four times the holding power of the most commonly used nails, the round wire nail. I was particularly interested in the wrought nails since the historical correctness of them was pleasing but largely because of the holding power and the rosehead nail head.
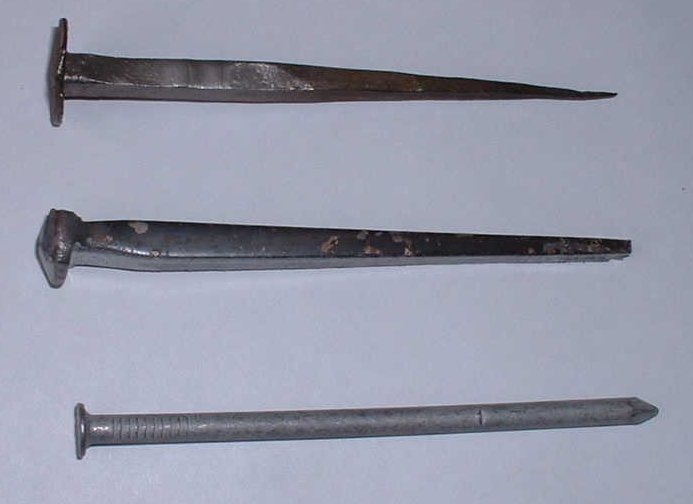 The top nail is a handmade nail, the middle a cut nail and the bottom nail is a modern wire nail (Picture from The History of Nail Making, Glasgow Steel Nail). The flat head will fit snug to the floor so we won’t trip or rough up our feet on them if we walk over them. The square tapered shaft with the wider head should hold even the most dynamic of our floor boards.
After ascertaining that there was an aesthetically and practical way of solving the problem of our boards popping up, I took to cleaning, filling holes, sanding and cleaning the floor boards. I started again in the Master bedroom and encountered fewer but similar problems. The difference was that after three hours of YouTube videos on finishing antique pine floors I was prepared. I could not quite bring myself to take the radical measures I had seen in video after video but I was far more willing to wade in and let the chips fall where they may. If the antique restoration experts could take a huge, walking drum belt sander with 36 grit sand paper to 200 year old floors surely I could take a 12″ random orbital sander to mine. My mistakes were confined to the 12″ diameter floor machine.
I don’t yet have the right attachment for a sanding screen but after watching the videos and thinking about it I decided the the majority of the connectivity between the machine and the sandpaper/sand screen was the weight of the machine head I got bold. I gathered up two rectangular sanding screens and put them under a polishing pad and off I went. The polishing pad feels a little like a plastic scrubby so the sanding screen had a little adhesion. With the weight of the head it worked just great. I started with 100 grit and went to 150 grit. I got to the library/office room and decided I might want to move faster. I popped on an 80 grit and started to sand. Saw dust blew everywhere. The 80 grit sandpaper takes a whole lot of wood with it. My courage failed me even though I had seen people sanding with 36 grit screens on the internet. I stopped the machine, felt the floor and then thought to myself, “a light sanding.” After sanding a few minutes I got my sea legs and grew more consistent in a successful figure 8 motion I had seen in the videos.  I followed the 80 grit sanding screen I went with 100 grit sand paper. Next was 150 and then a 220 sanding screen. I vacuumed between each sanding. Before the second sanding I made sure all of my holes were filled and dry. Some boards were really holey and had a lot of patches. Others were pristine.
One of the people who worked on the house today had his young daughter with him and she and I went on our hands and knees patching the holes and the small splits in the wood to prevent further damage. We made up a silly song, “We patch the holes so you don’t stub your toes….” It was not a good song but it was fun to have the curiosity of a little one while I worked on the holes. She made some credible patches too that sanded well and will take stain tomorrow blending into the overall floor without showing it is a repair.
Everything worked today. Because of a babysitter who did not show up for work I had the help of a cheerful and curious little girl as I patched the floors. I sanded with conviction and was rewarded with smooth, silky floors ready to take stain tomorrow and top coat on Wednesday and Thursday. On Friday we can look with satisfaction at a job well done and contemplate our move-in date which will be well before June 28, the fateful two year anniversary of the wildfire that took our home from us.
